HT
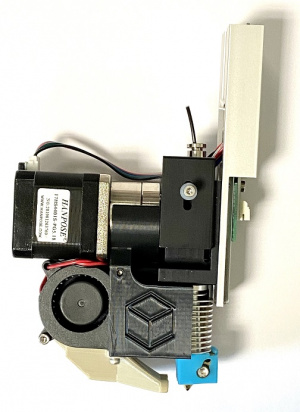
The HT3 series heads are our new HIGH TORQUE, dual-drive filament heads, available for 2.85mm filaments, and available in a 0-250°C range or a 275-450°C range.
| 0-260C | 275-450C | |
|---|---|---|
| 2.85 mm | HT3-250 | HT3-450 |
The HT3-250 is for use with the following materials:
- ABS (Acrylonitrile Butadiene Styrene)
- Flame Retardant ABS
- ABS - PC Alloy
- Conductive ABS
- Smart ABS
- HIPS (High-Impact PolyStyrene)
- LayBrick
- LayWoo-d3
- Nylon
- Taulman 618, 645, 910
- PC (PolyCarbnoate)
- PET (PolyEthylene Terephthalate)
- PETG PolyEthylene Terephthalate Glycol-modified)
- PLA (Polylactic acid)
- Conductive PLA
- SS PLA (Stainless Steel infused)
- PP (PolyPropylene)
- PVA (PolyVinyl Alcohol)
- T-Glase
The HT3-450 is for use with the following materials:
- PC (PolyCarbnoate)
- PEEK (PolyEther Ether Ketone)
- PEKK (PolyEther Ketone Ketone)
- PPSU (PolyPhenylSUlfone)
- Ultem
Videos
- General Filament Head Videos:
Description
- The HT* heads are fed filament from the top, through low friction tubing seated into a pneumatic fitting.
- A single high-torque motor drives gears that advance and retract the filament from both sides.
- Beneath this, the filament enters into an internal PTFE guide tube, which leads the filament to the fusion or melting zone, and then through the nozzle.
- HT* heads take industry standard M6 nozzles.
Loading the Head onto the Printer
As with all Hyrel heads, the following process should be followed:
- Start with a level bed and Repetrel running and connected to the printer.
- Load the gibs on the Head into the gib slots on the Yoke from above and slide the head down into place; the last mm of travel should be done gently, ensuring that the electrical connector seats properly (firmly and completely) into the receiving connector.
- Ensure the LEDs on the print head are flashing - this means the Head is communicating with the Motion Controller.
- Tighten the thumbscrew in the rear, to prevent the head from moving relative to the Yoke.
- If the Head doesn't show up in Repetrel, press and release the RESET button on the front of the printer.
- Once the Head is shown in repetrel, proceed to setting your Z-Zero position.
Loading material into the Head
HT* heads all ship with a remaining piece of filament from the last test print. We recommend leaving a few cm of filament above the head when changing heads.
Unloading:
- With the head properly seated and the emergency stop OUT, warm the head to the service temperature of the presently loaded material.
- If presently loaded to a spool, press down on the blue pneumatic fitting and release the guide tubing; then cut the filament a few cm above the head.
- Press the manual feed lever (at the top left of the head's 103 circuit board) to the left, retracting the filament. Retract until the filament comes free of the motor shaft, then remove.
Loading:
- Straighten (if needed) the last few cm of the new filament, which should be routed through the guide tubing. Insert it down through the pneumatic fitting on the top and centered between the two bearings, between the bearings and the drive shaft of the motor.
- Press the manual feed lever to the right, advancing the filament until the lead end advances into the white PTFE tube.
- In repetrel, click the motor on at 500 (pulses per second) until the new filament advances to the melting zone and forces the old filament out. Advance about 30cm of filament, checking for smooth sides and uniform color.
- Remove excess filament with tweezers. Seat the guide tubing. You are ready to go.
Default Parameters
Default settings for all HT series heads are shown on the Filament_Heads page.
Adjustments
The only adjustments needed should be changes to the PRIME and UNPRIME settings, and then only if your material is particularly flexible or compressible. In dialing in new settings, I usually double or half the settings for both STEPS and TIME, then make another print and reassess.
Firmware
With version 4 and above, all heads take the same firmware!
Maintenance
Very little maintenance is required on this head. Use a wire brush or tweezers to remove any excess plastic on the nozzle, and use a shop vac or air hose to suck or blow away any buildup of eroded filament in the feed chamber and/or on the hobs (teeth) of the motor shaft.
Changing Nozzles
How to disassemble the nozzle from the HT* head:
- Carefully:
- Heat to the printing temperature of the material loaded.
- Move the manual lever to the left, retracting material until it is free of the hobbed shaft, then remove by hand.
- Turn off heat to the head and remove it from the yoke.
- With a 1/4" driver or wrench, remove the nozzle.
- . Inspect the nozzle cavity for any stray material; if found, remove with tweezers, solvent, air pressure or other means.
How to reassemble the nozzle on an MK1 head:
- Carefully:
- Ensure your HT* has no filament loaded.
- With a 1/4" driver or wrench, attach the nozzle.
- Use normal procedure for heating and loading filament.
Please let me know if any of that is not clear.
