Connectivity
Whether connecting from the Tablet or another PC, we cannot control what COM port the printer is assigned to. Here is what to do if Repetrel is not connecting to the Printer (the motion controller).
Quick Note: 90% of the time, when the unit is powered with no connectivity, it is either a loose connection on the USB cable or the wrong COM port has been selected.
Click any image for a larger version.
Please note that this page is for communications issues. If Repetrel is showing your heads and printer, but you CANNOT OPERATE (heat, move) your heads or bed, you may not have a communications issue, but CHECK IF YOUR EMERGENCY STOP IS ENGAGED. The E-Stop will prevent power to your motors and heating elements.
NOTE: Standard troubleshooting is based on controlling the printer from the tablet we ship (and test) with. If you are controlling your printer from a computer other than the tablet we ship with, PLEASE reseat your USB cables and then follow the instructions at USB.
Video
The following video is all that most people will need to reset their COM port:
https://www.youtube.com/watch?v=RlJqdhtpB6Q
Is the Printer Powered Up?
Ensure that:
- The power supply is plugged into a known good receptacle;
- Older power supply is set to the proper voltage (115/230 VAC) - newer ones (since ~ 2020) are autodetecting and autoswitching;
- The power supply is turned on; and
- The power button is pressed in.
When this is the case, on a 30M, the Power and Reset buttons should be illuminated:
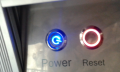
30M Power, Reset Buttons
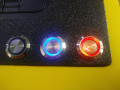
16A Power, Reset Buttons
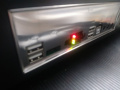
New ESR, EHR, 30M Indicators


When your printer is powered up, as above, we move on to the motion controller:
Is the Motion Controller working?
When the motion controller is working properly and communicating with another device over CANBUS (the hotbed controller and any loaded heads), you should see (on ESR and 30M units) a blinking green "heartbeat" light on the front of the spine, about 6cm up from the bottom and about 2cm in from the right:

Newer printers will have status LEDs on the Tablet Interface Board:

NOTE: newer models may not have any visible heartbeat.
If the heartbeat is missing, first unload any print heads and reset the printer:
If this was unsuccessful, disconnect the hotbed controller by engaging the emergency stop, then grabbing all wires firmly and pulling to the left; then load a print head and reset the printer:


If the heartbeat is still missing, there are two potential causes:
ALL UNITS HAVE BEEN THOROUGHLY TESTED BEFORE SHIPPING. IF YOU HAVE AN ISSUE, CONTACT US. DO NOT CHANGE FIRMWARE OR SETTINGS UNLESS INSTRUCTED TO DO SO BY US.
One, the firmware on the motion controller may not be in sync with the firmware on the other device(s). Our fix for this is to flash a known version to the motion controller and a compatible version to the print heads. However, this is not usually the root cause unless you are working with some older equipment which has not been properly updated during 2016 or later.
Two, we may need to press the reset button on the motion controller itself:
- Use a 2.5mm hex driver to remove the screws holding the rear cover in place;
- Press the reset button on the motion controller card:

If we still haven't restored the heartbeat, there is some issue with the motion controller itself, so we should flash the current firmware onto it again:
ALL UNITS HAVE BEEN THOUROUGHLY TESTED BEFORE SHIPPING. IF YOU HAVE A NEW UNIT WITH AN ISSUE, CONTACT US. DO NOT CHANGE FIRMWARE OR SETTINGS UNTIL WE HAVE TRIED TO MAKE THIS WORK.
In Repetrel, click File > Update Firmware > 407 Motion Controller:

You should see the green message "Connected" when connected. If you see a yellow message "Not connected Check Boot Switch Press RESET Button" instead, check your USB connectivity to the printer and press the reset button. Once you are on firmware 2.4 and above, you will not need to change the boot/run switch to connect or flash.
Next, click Select File, highlight the correct file, and click Open:

Last, click Program and wait for the process to complete and the window to close.

Now you should have the heartbeat. If not, there can be two causes.
1. You might not have good CANBUS communications. We need at least one device to be communicating properly, and NO devices on mismatched firmware (since some of the protocols have changed over the years); this includes the hotbed controller and the heads. To determine if this is the case, disconnect the hotbed controller by engaging the emergency stop, then grabbing all wires firmly and pulling to the left; then load a print head and reset the printer:
2. We might have a problem with the 407 Motion Controller. We have had less than 1% of these go bad, and when they do it has been after a severe power surge. Contact us if this is the case.
Once you have the heartbeat, we can proceed. Please note that some newer models do not have a heartbeat LED.
PLEASE TRY UNPLUGGING THE CABLING AND THEN PLUGGING IT BACK IN. USE ANOTHER USB PORT IF POSSIBLE. POOR CONNECTIONS ARE THE MAIN CAUSE OF CONNECTIVITY ISSUES.
Are we Connected?
Please note that with Repetrel v3 and above, even though you are still using a USB cable, you MUST connect over the a virtual COM port to the UART. The process for selecting the COM port is the same.
Version 2.x
Note: in v3 and later, the "refresh" functionality is activated by clicking on the COM menu button.
If Repetrel doesn't automatically connect to the printer at this time, we may need to manually set the COM port:
In Repetrel, click on the Comm Link tab:

Click on the COM# button and select Refresh:

Click on the COM# button again, and select the highest COM port shown; you may need to cycle through all available ports, but it is usually the highest numbered one displayed:

Ensure that the communication rate is set to 38400; click Apply, and then click Ping. You should get the message "Printer Connected" as shown below:

Versions 3.x and 4.x
If Repetrel doesn't automatically connect to the printer at this time, we may need to manually set the COM port.
Setting the COM Port and BAUD Rate
In Repetrel, under the Interface tab and the COM tab, click the COM button to list the available ports:

NOTE: We cannot control what port Windows assigns to the printer, but it is usually the last port used and it is usually the highest numbered port.
Select a COM port, ensure the rate is set to 38400 (or, very rarely, to 115200), click Apply, then click PING:

Check to see if you connected over the UART or USB protocol.
If it's USB, repeat the process selecting the other port.
USB:

UART:

Delving Deeper
If you really want to know what's what with your communications, click the HELP menu and select "List USB devices on this computer":

You should see not only the FT232R USB UART under Devices, which represents your actual motion controller:

But also, under Unspecified, you should see the STMicroelectronics Virtual COM Port, which represents the port on our tablet interface board which routes your comms to the motion controller:

This should have a com port listed at the end of the name, in parentheses. Double-click to open Properties:

Click on the Hardware tab and see if there are any warnings (a hazard icon would be present):

If you have the hazard icon, perform the Installing Drivers tasks again.
If all looks well, read the port number; this is the port you want to use to connect:

Select that COM port, ensure the rate is set to 38400, click Apply, then click PING:
You should now be connected over the UART protocol:
Missing the COM Driver?
If your lovely operating system decided to upgrade stuff for you, and your tablet no longer talks to the printer (and you have tried the steps listed under "Connectivity" on the sidebar), please download this driver, uncompress it, and run as administrator (the default account on all tablets is an administrator account).
Thanks, Microsoft!
Heads Unresponsive?
If your head is plugged in, but not working as expected, there are a few things that might be wrong.
Each head has both a mechanical connection and an electronic connection.
The mechanical connection is to lock the head rigidly in place, and also to adjust so that multiple heads can all have their nozzles at the same "Z-zero" height.
The electronic connection provides power to the head (for motor and, if present, heater) as well as bi-directional communications between the head and the motion controller (and from there, to Repetrel).
- (A) With the head unloaded, loosen the two screws on the back by about 90-180 degrees - just enough to be able to wiggle the circuit board.
- Push your emergency stop in, load the head as far down as it will go, and then tighten the thumbscrew (or, on Hydras, the set screw with the 3mm hex driver - called a thumbscrew hereafter).
- (B) Now seat the circuit board so that it makes full contact along the entire connector; improper seating may turn the LEDs on without providing power.
- Seat the spacer board all the way down, and tighten the screws (A).

Ready to go!